Cursor movement from the Arduino is always relative. So every time the analog input is read, the cursor's position is updated relative to it's current position.
Two analog inputs ranging from 0 to 1023 are translated to ranges of -12 to 12. The sketch assumes that the joystick resting values are around the middle of the range, but that they vary within a threshold.
The pushbutton allows you to toggle mouse control on and off. As an option you may connect a status LED to pin 5 that lights upwhen the Arduino is controlling the mouse. A second pushbutton may be connected with another 10k ohm pulldown (to GND) resistor to D3 to act as the left click of the mouse.
NB: When you use the Mouse.move() command, the Arduino takes over your computer's cursor! To insure you don't lose control of your computer while running a sketch with this function, make sure to set up a controller before you call Mouse.move(). This sketch includes a pushbutton to toggle the mouse control state, so you can turn on and off mouse control.
Step 1: What You Need?
1 x Arduino Leonardo, Mirco, or Due Board
2 x Axis Joystick (Can be found in 37 Types Sensor in 1 Starter Learning Sensor Kit)
2 x Axis Joystick (Can be found in 37 Types Sensor in 1 Starter Learning Sensor Kit)
1 x Momentary Pushbutton (possibly integrated in the joystick)
1 x LED
1 x 220 Ohm Resistor
1 x 10k Ohm Resistor (if needed as pulldown)
1 x LED
1 x 220 Ohm Resistor
1 x 10k Ohm Resistor (if needed as pulldown)
Male-to-Male Jumper Wires (MM)
Don't have components? Don't worry. Just click the component's name.
Step 2: Build Your Circuit.
Connect your Leonardo board to your computer with a micro-USB cable. The pushbutton is connected to pin 6. If you're using a part like the Joystick shield pictured below, you may not need a pulldown resistor. The x-axis on the joystick is connected to analog in 0, the y-axis is on analog in 1.

Step 3: Upload The Code.
1. Select the Arduino board type: Select Tools >> Board >> Select your correct Arduino board used.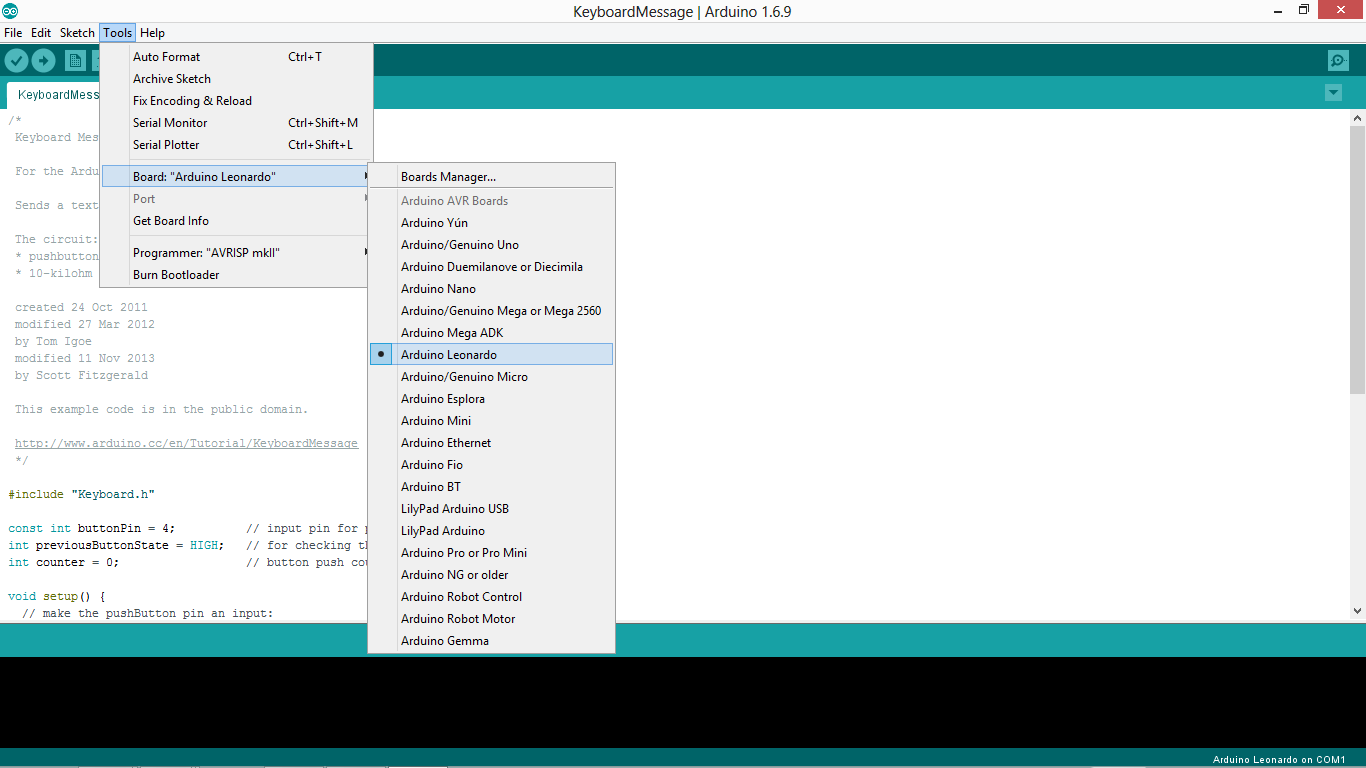
2. Find the port number by accessing device manager on Windows. See the section Port (COM&LPT) and look for an open port named "Arduino Leonardo (COMxx)". If you are using a different board, you will find a name accordingly. What matters is the xx in COMxx part. In my case, it's COM3. So my port number is 3.
Select the right port: Tools >> Port >> Select the port number.

3. You can find this code in the example of Arduino IDE.
Select File >> Examples >> 09.USB >> Mouse >> JoystickMouseControl
Click press the "upload" button (see the button with right arrow mark).
Click press the "upload" button (see the button with right arrow mark).

My Robot Education Sdn. Bhd. (Robotedu.my) was founded in 2015 as the first robotics education centre in Malaysia to provide Arduino-based robotics courses for youths. Our vision is to be able to provide robotics education to every youth in Malaysia.


0 comments:
Post a Comment